
CONCEPT
Around December 2020, I designed “ORI-COW-SKULL”. The theme of reconstructing the beauty created by the nature of animals seems to be an eternal theme for human creation. The process of designing the “ORI-COW-SKULL” was not only a pleasure of origami, but also a pleasure of touching a glimpse of the completed beauty of the cow.
What also attracted me to the creative process was the act of focusing on a part of the animal and reconstructing it in origami. In order to represent the whole body of an animal in origami, my current skill level requires me to reduce the “resolution” of my interpretation. It seemed like a good idea to focus on the head, perhaps the part of each animal that is most characteristic of the design, in order to explore the subject more deeply.
The main reason why I chose deer out of all the animals in the world is probably because of its high affinity with the recent theme of interior design. In other words, I focused on the history of deer, which, like cow skulls, have been used as interior decorations in people’s homes since ancient times. Of course, there are other fascinating animals besides deer, and I am working on designs for them as well, but for now I would like to focus on the theme of deer.
I had two main concepts in mind when designing the deer. The simplest way to describe them is “resolution of expression” and “harmony of line expression and surface expression.
As I have already mentioned, I decided to focus on one part of the animal, the head of a deer. Of course, it is possible to pursue an object through abstract forms (e.g., cubist expression). However, it is my theory that abstraction does not precede figuration. (Although origami itself abstracts the object, I believe that the creative stance that places emphasis on realism in the balance between abstraction and realism is still realist in origami expression. ) Therefore, I decided to use realistic and high resolution expression as one of the concepts for this project.
The second concept also comes from the orientation toward realistic expression. Since the skull of the cow was itself composed of smooth surfaces, I focused on the “surface” as an expression in origami. However, in the case of the theme of deer, I thought that the expression of the “line” as “hair” was just as important as the expression of the “surface”. The second concept was to try out the harmony of “surface” and “line” that I had been working on with the wineglass on a more complex subject such as animals.
DESIGN
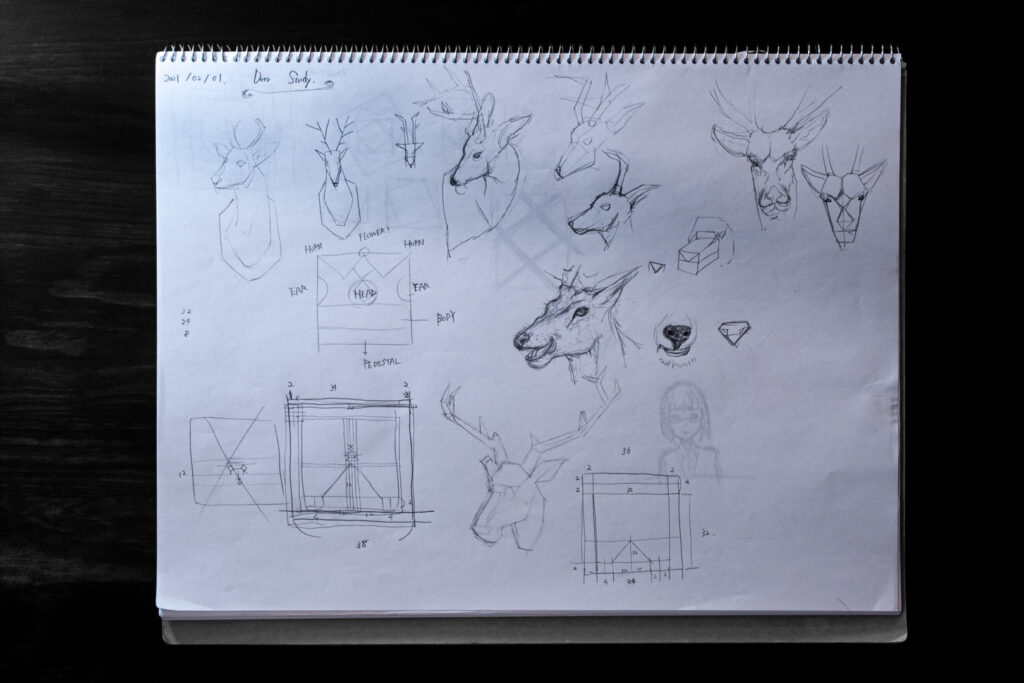
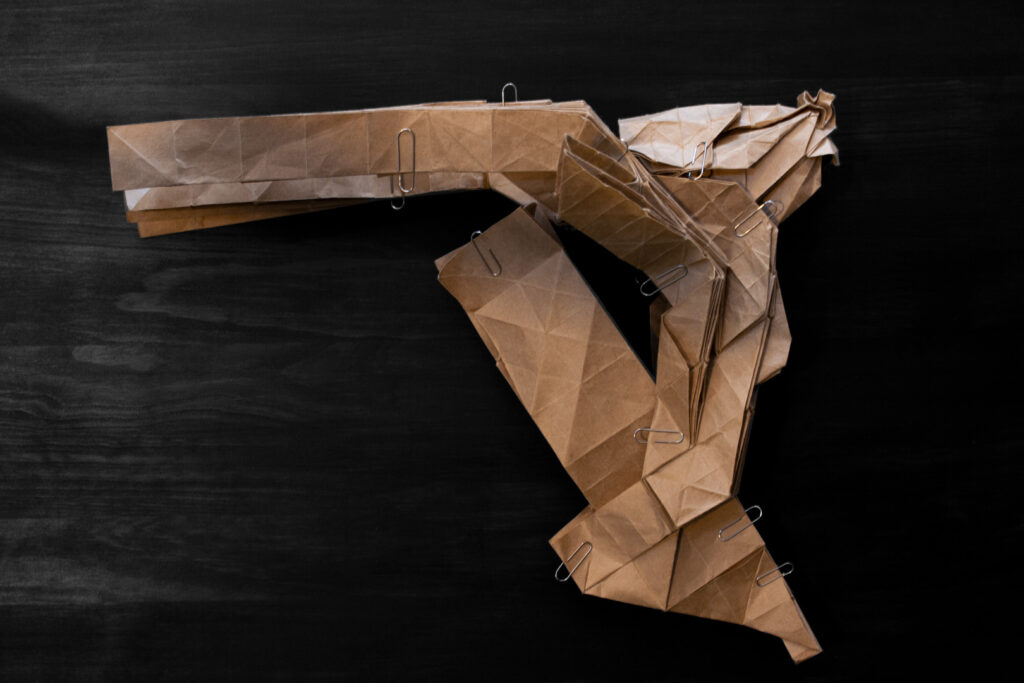
The photo shows the initial studies I made for this work. The order of creation is bottom right, top left, top right, bottom left. In my recent design method, I first decide how to use the entire paper. After that, I look for parts that will be the starting point, and gradually increase the overall resolution from there.
The first step, paper distribution, is to determine the number and length of the most basic corners needed to represent the subject, and how they will be placed in the paper. The study at this stage is the one in the lower right of the photo. In this case, two horns, two ears, a face, and a base part, and since the structure was simple, I was able to determine it right away.
(To put it more technically, the two upper corners of the square are used for the corners, the ears are used as the sides, the internal parts are used for the face, and all the rest are used for the hair and the base. See sketch 1).
After deciding on the antler placement and having a rough idea of how to complete the project, I decided to look into the deer in detail. Let me introduce some of the details. Deer have been a very popular animal since ancient times, used as a hunting target, as food, and in fairy tales and proverbs. Biologically, they belong to the order of mammals, the even-toed ungulates, like cows and giraffes. The Japanese deer, which are often seen in zoos and Nara in Japan, have relatively thin body hair, which is not very suitable for the expression of hair, one of the concepts of this project.
Therefore, I decided to use the winter coat of the American red deer (also called elk or wapiti in the local language), which lives in North America, as a reference. Normally, the best way to prepare for this project would be to actually observe and sketch the animal, but since that was not possible, I sketched the animal from photographs on the Internet or in illustrated books, and substituted the actual animal by looking at the one displayed as an interior decoration. The examples of paper crafts were also very helpful in learning the expression of the surface.
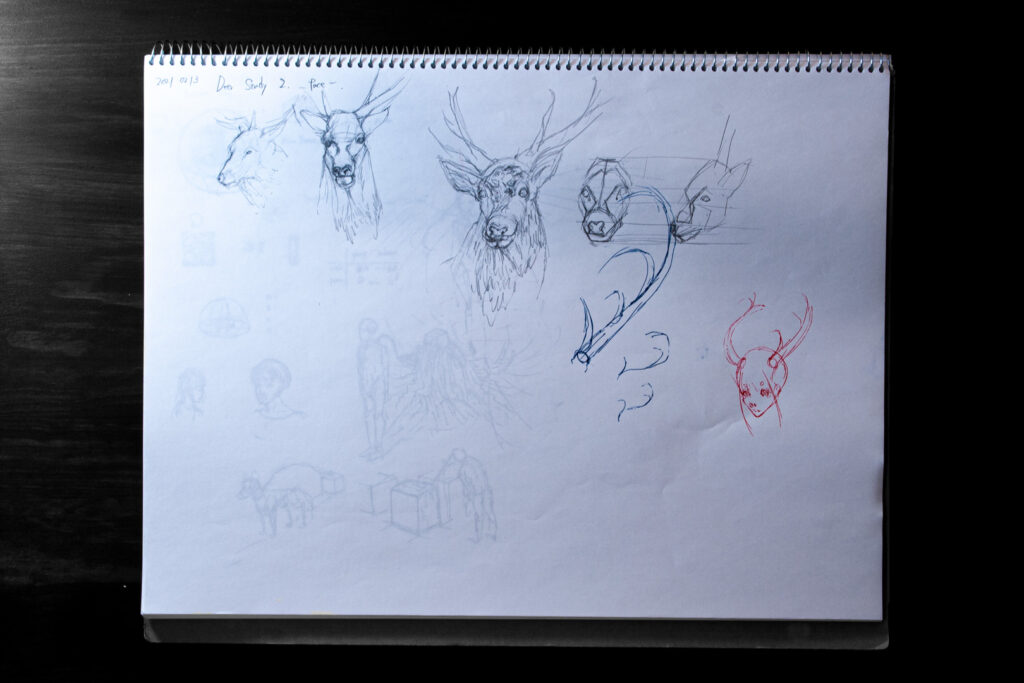
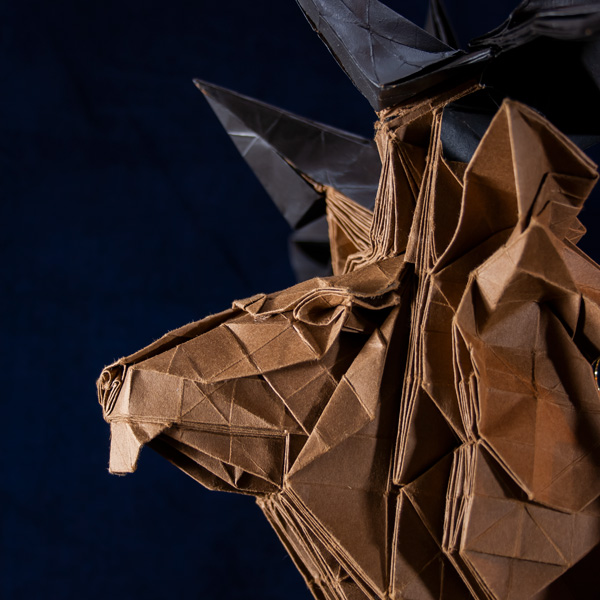
After about two weeks of collecting materials while working on other works, I had a better understanding of the deer, and started to work on a partial study. I believe that the nose is the most important part of the deer head, or rather the head of any animal in general, in terms of origami. It is located in the center of the face and protrudes more than other parts of the face. So I made a study of the nose and the bridge of the nose. This is the one on the upper left in the photo above.
This may sound a bit technical, but I think the most interesting aspect of this work in terms of origami is the three-dimensional structure used to express the bridge of the nose. By doing so, the internal corners that make up the face are made three-dimensional like a triangular prism when viewed from the side, supporting the expression of the face.
In addition, I was able to make the expression of the hairline more convincing by absorbing the deviation of the angle of tanθ=1/2 caused by the three-dimensional structure at the connection of the horn. In addition, the nose and eyes were converted to half the width of the basic grid, and I personally like the fact that the width conversion structure was successfully integrated into the connection part of the three-dimensional structure. The series of folds created by the width conversion also act as the starting point for the “Miura folding” used to express the hair.
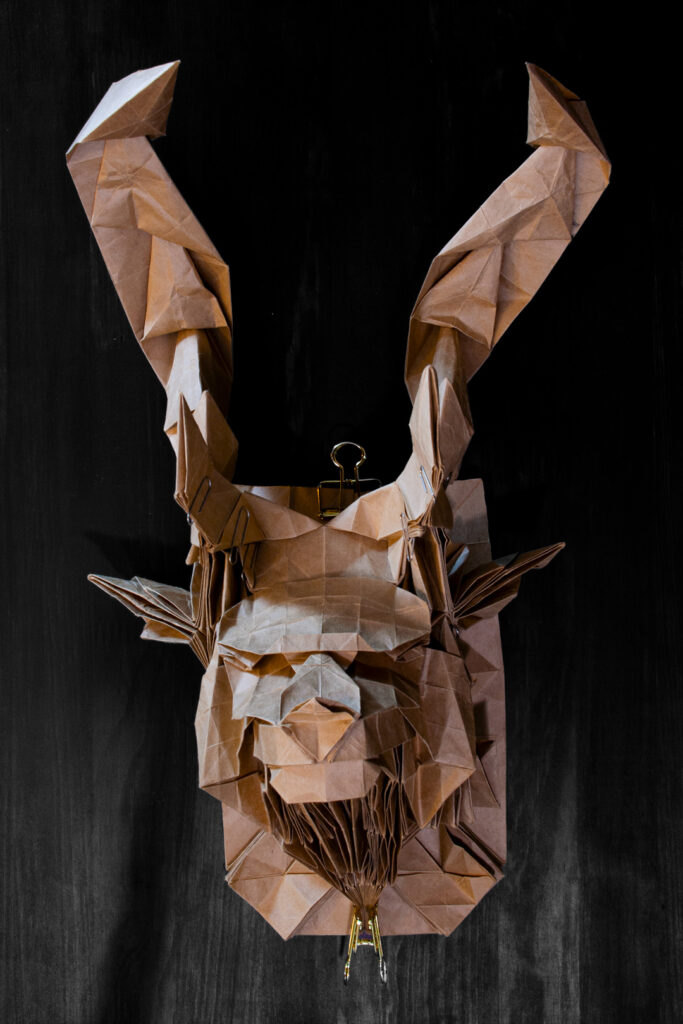
Now that I’m done with the technical aspects of origami, I’d like to look at the overall study. The hair from the nose to the eyes and the lower part of the neck went relatively easily, but there were three problems in the overall study: the connection of the hair up to the ears, the expression and connection of the horn, and the expression and connection of the base.
These problems were very difficult to solve, but at the same time, they were very challenging, and I was sure that I would be able to solve them. In the end, since I could not get a satisfactory answer in the study, and since I had not been able to check the quality of the inside-out, I moved on to the main folding with the tentative structure. With the help of chance and intuition, I managed to put it together into a certain shape. That is the finished product.
Also, as an experiment this time, I made GIFs of the photos taken at fixed points, and recorded the journey to completion as if it were a time-lapse movie. I didn’t take many photos in the latter half of the work, so it seems to be a bit of a letdown, but it’s interesting to see how it feels as if I folded this work in an instant without doubts. (In fact, it was the result of a lot of doubts…)
COMPLETE SHAPE
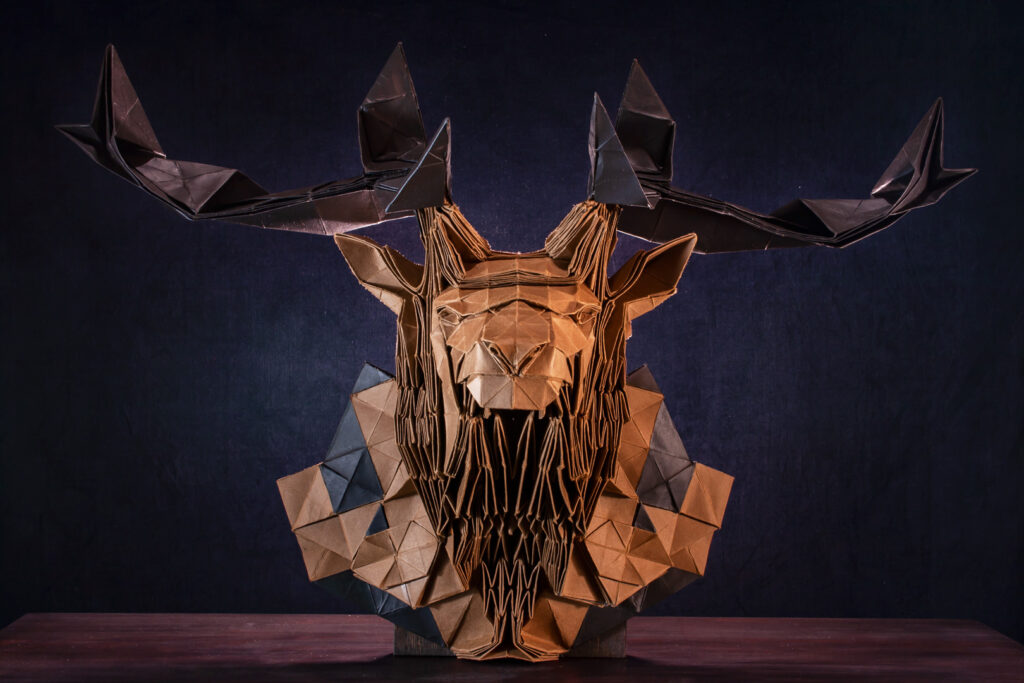
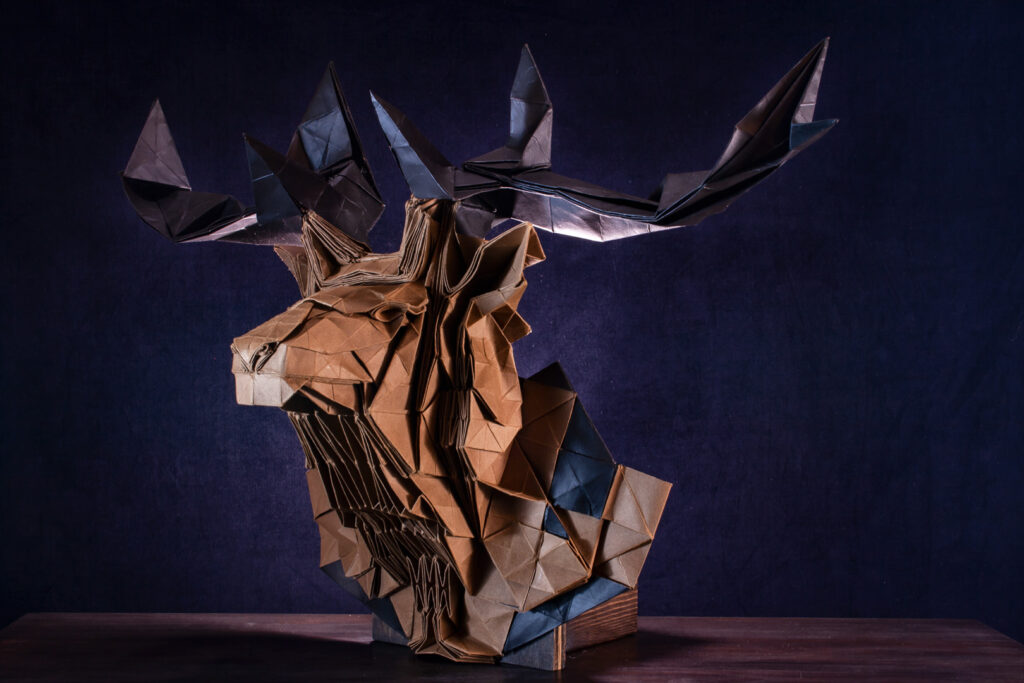
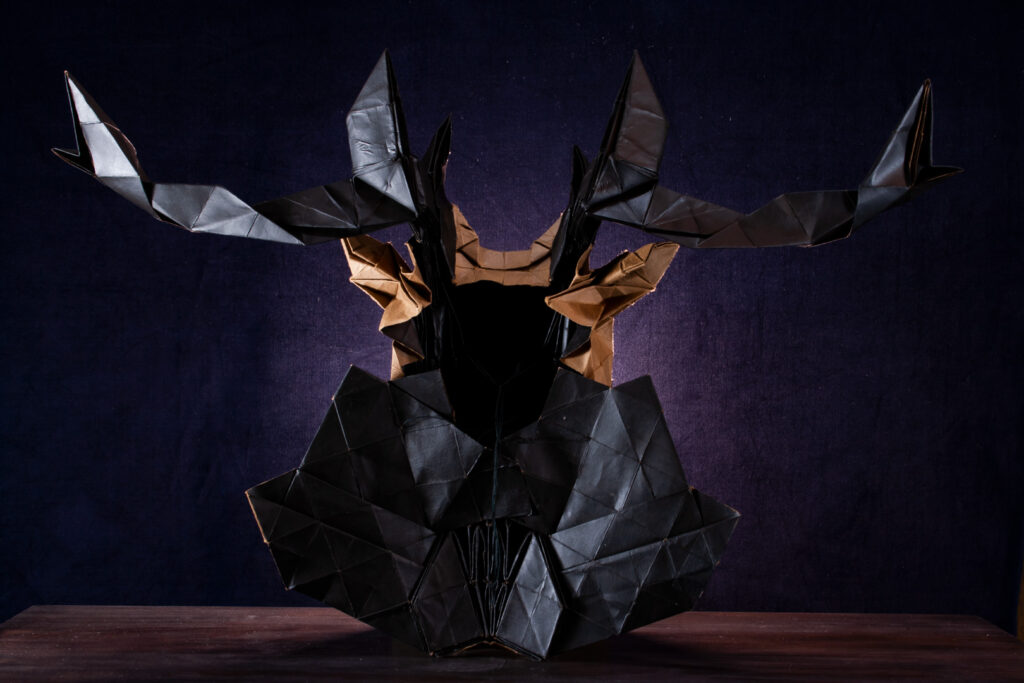
Photos from the front, back, side, and the back side that I haven’t published on social media. It was unexpectedly difficult to capture the long horn. I managed to capture the whole thing by attacking the very edge of the angle of view. I used a dark blue background color as a complementary color to the basic brown color to create a calm picture.(The paper I used was NT RASHA, of which the back side was colored with acrylic paint)
LIMITATION
I have completed this work as a conclusion, but there are still a number of regrets. The first is the structure of the horns. I didn’t put enough reinforcing structures such as a pinned folding between the connecting part and the three-dimensional part, so the horns hang down a little. I could have added a wire or something, but I wanted to use the strength of the paper if possible.
I would also like to make a deer with more mature horns, since the horns are still “immature”. Based on the various lessons I have learned from this project, I am looking forward to making a more sophisticated model with more upgrades like wineglasses.
THANK YOU!
Thank you for reading this far. If you have any suggestions or questions, please feel free to comment. See you soon.
2021.03.28 Tomoaki. H.
Leave a Reply